Ensure your MacBook camera is webinar-ready. Follow these quick steps to test and adjust your video before going live.

Webinars have become a cornerstone of professional communication, education, and networking. Whether you’re hosting or attending one, first impressions matter—and that starts with your webcam. A blurry or malfunctioning camera can derail your confidence and leave a less-than-ideal impression on your audience.
Testing your camera before a webinar is essential. Luckily, MacBook users can access various tools and methods to ensure their camera setup is perfect.
Key Takeaways:
- Testing your MacBook’s camera is simple using built-in apps.
- Browser-based tools and webinar platforms offer additional testing options.
- Troubleshoot common issues like blocked permissions, poor image quality, or lagging cameras with practical fixes.
- StealthSeminar provides the best-automated platform for seamless webinars, ensuring everything runs smoothly.
Ready to deliver a stellar presentation? Start testing and make every impression count!
Why Testing Your Mac Camera Matters
Preparing for a webinar can be nerve-wracking, especially if you’re presenting to an audience eager for insights. But one thing, don’t you want it distracting you? Technical hiccups. One of the most common webinar woes is a malfunctioning camera.
Whether you’re a seasoned presenter or a first-time host, testing your MacBook’s camera before your webinar ensures:
- Clear visuals that engage. Viewers connect better when they see you clearly.
- Technical reliability. Testing eliminates surprises during live or recorded sessions.
- Increased audience trust. A polished appearance conveys professionalism and care.
A survey of 4,200 work-from-home employees found that 49% reported increased engagement during online meetings when their cameras were on, while only 10% felt disengaged with camera use. Having the right camera is essential in this situation.
If you’re running an automated webinar using StealthSeminar, a flawless camera device ensures every attendee experiences the same high-quality presentation. With just a few minutes of preparation, you can avoid embarrassing moments and ensure you look your best on camera.
Steps to Test Your Camera on MacBook
Webcams are so important these days. They have become a mainstay in our digital lives. It’s no longer just about personal video calls. Professionals use them for meetings, and companies host webinars for marketing and training.
A clear, working webcam is a must for smooth and effective communication. Here’s how to test camera on MacBook.
Step 1: Test via Webcam Offline
Sometimes, you just want to test your camera without relying on the internet. Luckily, both Windows and macOS have built-in testing tools.
Before diving into software testing, confirm that your MacBook’s built-in camera is operational.
- Look for the Camera Lens: Open your MacBook and locate the tiny camera lens at the top of your screen. Ensure it’s clean and free from obstructions.
- Use a Microfiber Cloth: If the image appears blurry, clean the lens with a soft, lint-free cloth if the image appears blurry.
Step 2: Use MacBook Applications

Your Mac computer comes with several pre-installed apps that allow you to test your camera quickly.
- Photo Booth:
- Open the Photo Booth app from the Applications folder or by searching it in Spotlight.
- The app will automatically activate your camera.
- If you can see yourself clearly, your camera is functioning correctly.
- FaceTime:
- Open the FaceTime app.
- Log in with your Apple ID.
- Your camera should activate, displaying your image in the app’s window.
- Call a friend or family member on FaceTime to verify that the audio and video are working perfectly.
- Skype for Business
- Start the Skype for Business application.
- Enter your Skype username and password.
- Double-click on the Settings icon. It’s usually on the right-hand side of your screen.
- Click on Video Device. A preview from your webcam should appear.
- Click on the Camera Settings button to adjust brightness, contrast, and other image settings.
- Microsoft Teams
- Open the Microsoft Teams application from your Windows search bar.
- Enter your Microsoft account information.
- Click on your profile and then click Settings.
- Click on Devices.
- You should see a webcam preview. If not, use the camera drop-down menu.
- Make sure the toggle for media permissions is turned on.
Step 3: Test via Webcam Online
If your webinar platform is browser-based, test your camera’s compatibility with your browser.
- Open a browser (e.g., Safari, Chrome, or Firefox).
- Visit a camera testing website such as Webcam Test or WebcamMicTest.
- Allow camera permissions when prompted.
- Verify the live feed to ensure your camera works seamlessly.
Step 4: Check System Preferences
Sometimes, macOS privacy settings block camera access for apps. Follow these steps to enable access:
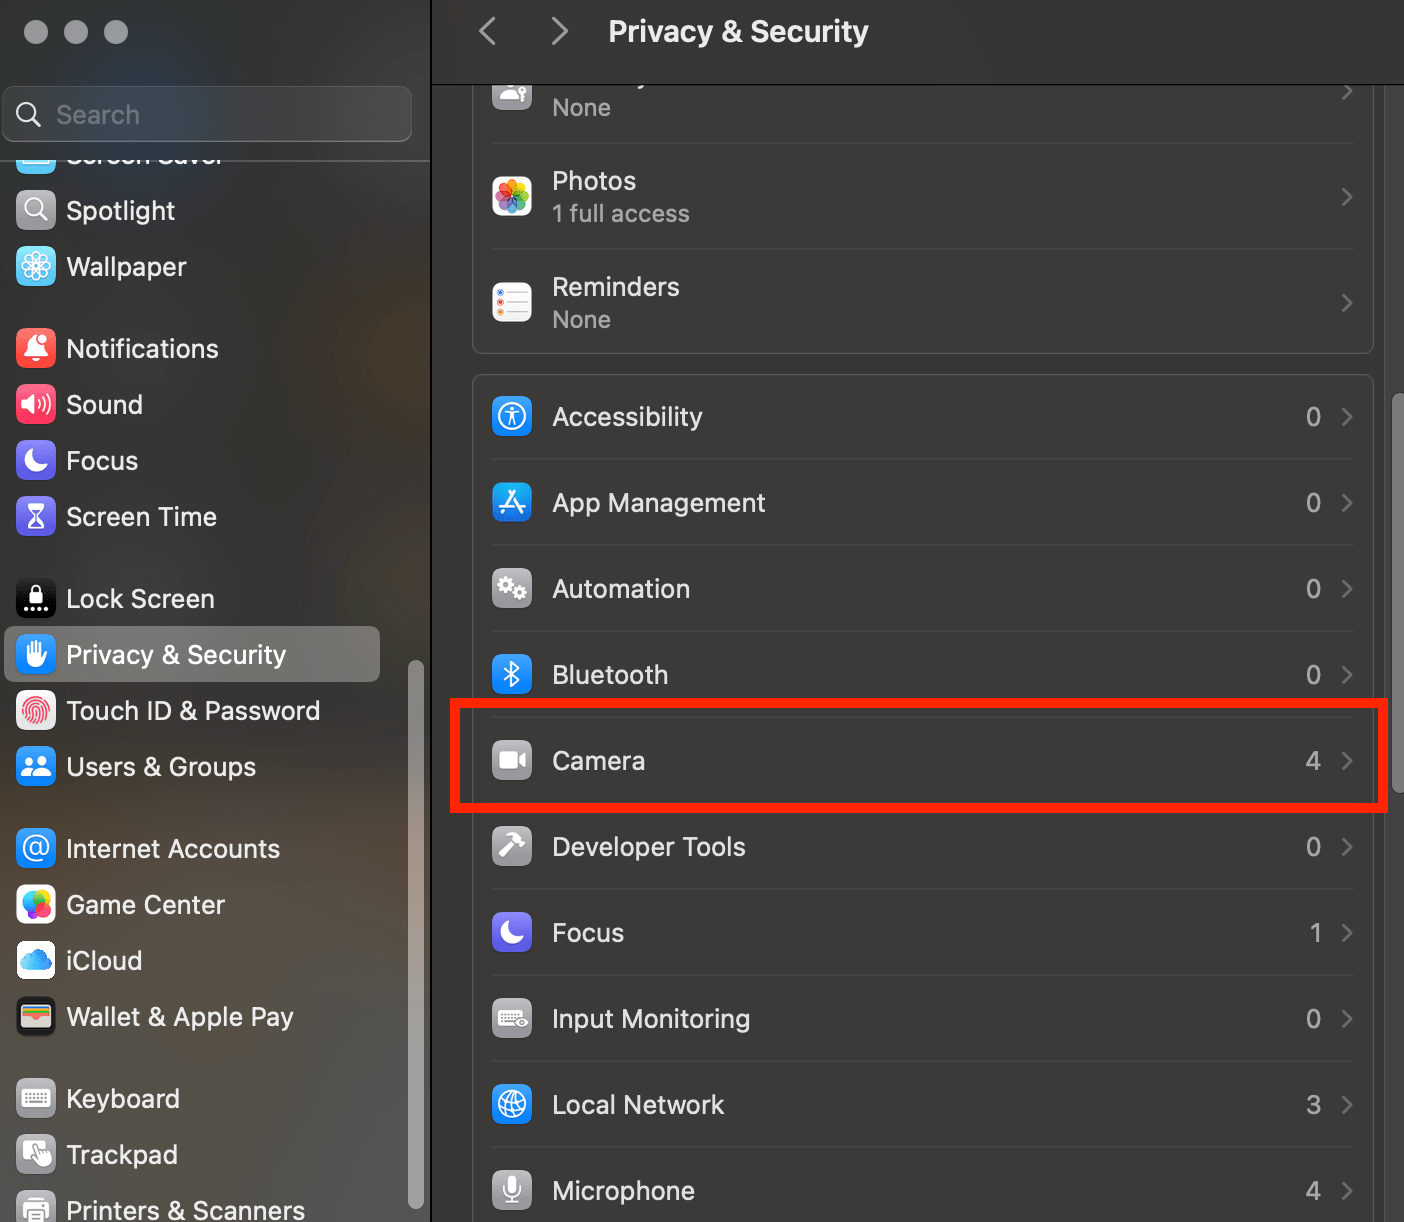
- Go to System Settings > Privacy & Security.
- Select Camera from the left-hand menu.
- Ensure the camera app you’ll be using for the webinar has the toggled on.
Step 5: Adjust Lighting and Background
Good lighting transforms how professional your video looks. Position yourself facing a window or use a ring light. Additionally:
- Choose a clutter-free background or a virtual one that matches your brand.
- Wear solid colors that contrast well with your backdrop.
Step 6: Check Internet Speed
Your camera feed’s quality is only as good as your internet connection.
- Test your speed using Speedtest.
- For webinars, aim for at least 3 Mbps upload speed.
- If your connection is spotty, consider using an Ethernet cable for stability.
Internet stability matters. Poor video due to slow internet speeds reduces webinar satisfaction rates.
Step 7: Test on the Webinar Platform
To guarantee smooth functionality, test your webcam directly on your webinar platform. Most platforms, such as Zoom, Microsoft Teams, and StealthSeminar, offer built-in testing tools.
For Zoom:
- Open Zoom.
- Click your profile picture > Settings > Video.
- Your live feed will appear.
For StealthSeminar:
- Log in to your StealthSeminar account.
- Open the webinar setup section and enable your camera.
- Preview the webcam feed to ensure alignment and quality.
StealthSeminar is the most profitable and best-automated webinar platform ever. It’s designed with user-friendly features that minimize technical issues. With StealthSeminar, your webinars run smoothly, making it easy to focus on delivering great content.
How to Optimize Your Camera for Automated Webinars
Let’s be honest: even the best camera can only do so much if your setup isn’t optimized. Whether you’re hosting an important automated webinar on StealthSeminar or a quick virtual meeting, tweaking a few things can make a world of difference. Here’s how you can step up your camera:
Adjust Camera Settings
Many platforms, including StealthSeminar, allow you to enable HD video. This simple step ensures your audience gets a sharp, professional-looking video feed. You don’t want to look like you’re streaming from the ’90s!
Other than that, outdated software is a recipe for glitches. Make sure your MacBook is running the latest version of macOS so the camera drivers are up to date. This ensures optimal performance and fewer hiccups during live sessions.
Quick Steps:
- Click the Apple devices logo in the top left.
- Go to Settings > General > Software Update.
- Install any available updates.
Improve Lighting
Lighting is everything. Even a high-quality camera can’t fix bad lighting.
Use Natural Light or a Ring Light
Natural light is your best friend, especially for daytime webinars. Position yourself so the light hits your face from the front or side (not behind). If you’re hosting at night or in a darker space, invest in a ring light or softbox light. They’re affordable and can transform your video quality.
Avoid Backlighting
Backlighting (light behind you) creates shadows and can make you look like a mysterious silhouette. Always face the light to keep your face clear and vibrant.
Enhance Audio and Visual Sync
Even the best visuals won’t matter if your audio and video don’t sync. Imagine speaking and having your lips move out of rhythm—that’s a distraction your audience doesn’t need!
- Test Your Microphone Settings
Before the webinar, do a quick sound check to ensure your mic works seamlessly with your video.
- Use Wired Headphones
Bluetooth headphones can introduce latency (that annoying delay between your voice and the image). Wired headphones provide a more stable audio experience and help you avoid this issue.
Clean the Camera Lens
This step is so simple yet often overlooked!
Dust, fingerprints, and smudges can build up on your camera lens over time. Grab a microfiber cloth (like the one you use for glasses or screens) and gently clean the lens before your webinar.
A clean lens means sharper images and better clarity, which helps keep your audience focused on you, not blurry visuals.
Choose an External Webcam
If your built-in webcam isn’t cutting it, you may want to consider getting an external one. When choosing a webcam, consider these features:
- Image Quality: For the best video quality, look for a high-definition camera, either 720p or 1080p. The higher the resolution of your camera, the better your image will be.
- Lens: A glass lens is better than a plastic lens.
- Microphone: If you plan to use the webcam for audio, make sure it has a built-in microphone. While it might not be sufficient for professional audio recording, it will suffice for video chats.
- Connectivity: Most webcams connect via USB, but some also offer wireless options.
- Additional features: Some webcams have extra features like autofocus, various resolutions, and frame rates.
Make sure that the webcam you chose is compatible with your Mac. You might need to install drivers if you get an external webcam.
Ready to set up your automated webinars? These small tweaks can make a difference!
Troubleshooting Common Camera Issues

Even after testing, issues may arise. Here’s how to address them:
Camera Not Detected
- Restart your MacBook to refresh hardware connections.
- Check if any app is using the camera and close it.
- Reset the SMC (System Management Controller):
- Shut down your MacBook.
- Press then hold Shift + Control + Option + Power Button for 10 seconds.
- Release the keys and power on your MacBook.
Poor Image Quality
Blurry visuals can distract your audience. Here’s how to fix it:
- Clean the Lens: Dust and smudges are often the culprits.
- Improve Lighting: Poor lighting can make even the best cameras look bad.
- Try Another App: Use different software to see if the issue persists.
- Update macOS. Ensure you have the latest camera firmware.
Camera Permissions Blocked
- Revisit System Preferences > Privacy & Security to enable camera access.
Lagging or Freezing Camera
- Check your internet speed. Most webinar platforms require at least 3 Mbps for video.
- Close background apps consuming bandwidth or processing power.
FAQs About Testing Your MacBook Camera for Webinars
Can I Use Third-Party Apps to Improve the Quality of my MacBook Camera?
Yes! 50% of hosts use a webcam and webinar software beforehand for webinars. Pre-planning, including camera testing, plays a significant role in successful webinars.
What Do I Do If My MacBook Camera Isn’t Working?
Restart your MacBook. Check app permissions under System Settings > Privacy & Security > Camera. Other than that, consider using an external webcam as a backup.
How Can I Look More Professional on Camera?
Use proper lighting and maintain eye contact with the camera. Choose a clean, distraction-free background. Lastly, wear solid colors that contrast with your surroundings.
Be Prepared, Not Surprised
Testing your MacBook camera before a webinar is a simple yet vital step for ensuring a professional presentation. From checking permissions to optimizing your setup with proper lighting and camera angles, a little preparation goes a long way.
When paired with StealthSeminar, the most profitable and best-automated webinar platform ever, you’ll deliver high-quality, engaging webinars effortlessly.
Ready to take your webinar camera to the next level? Start testing your camera and explore the seamless features of StealthSeminar today!
